
Brief update: awesome video from Defcon was recently posted. You can find it here: DEF CON 24 – Andy Robbins. Rohan Vazarkar, Will Schroeder – Six Degrees of Domain Admin
The following post is a guide on performing risk audits for your Active Directory infrastructure with BloodHound. It’s a beginners guide. Bloodhound is a tool created for and widely used by the red team. That said, it provides excellent data for risk mitigators and auditors looking to validate or prove out network hardening policies. Therefore, I’d maybe call this a purple team tool. If you have found yourself here it’s most likely you are already familiar with BloodHound and are trying to get help using or understanding it.
What does Bloodhound do? In my own words, it maps your AD infrastructure. The map uses intel gathered from querying the domain controllers. This information (intel) is used to provide vulnerable locations in the AD infrastructure and associated endpoints, thus allowing an attacker to target the weakest accounts, and gain the quickest access to highest privileged accounts. For more info about the history of BloodHound check out Andy’s Intro to BloodHound. Andy is a friend and the visionary behind BloodHound. My networks are better off having been put to test by his great talents.
Assumptions
This technique requires a database, an ingestor, and a client. We are going to run the whole thing on one machine. It is possible to run the BloodHound ingestor from one machine (the machine that actually talks to AD to gather information), the database on another, and the client on yet another. In this example, I will be using one machine.
Warnings
The data being collected by BloodHound should be considered sensitive. Only run the database on secured machines, and if possible destroy the data. That said, let’s get into it…
What You Need
- Create a new powershell (.ps1) file that contains the following code (for this guide, we will name the file execute-bloodhound.ps1:
-
Get-BloodHoundData | Export-BloodHoundData -URI http://localhost:7474/
-UserPass "neo4j:neo4j"
-
- Download the powershell ingestor script from GitHub and name it whatever you want. In this case we will use the name powershell-ingestor.ps1
- Download neo4j Community Edition from neo4j.com
- Download Bloodhound for Windows from GitHub
Once you have this stuff, you are ready to go. Going forward we will basically do the following:
- Install Neo4j database
- Start the ingestor process (which will ship data into Neo4j)
- Use BloodHound to parse that data into graphical form
Install Neo4j


Make sure at this step that you leave the box checked for “Run Neo4j Community Edition”

Click “Start”
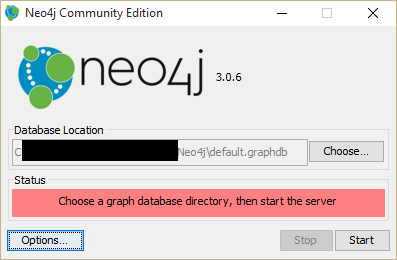
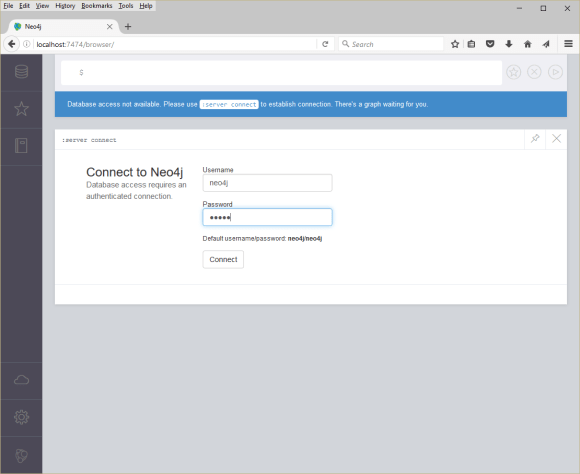
Verify it started properly

Log in to http://localhost:7474 using the default credentials. If you get in, then success!
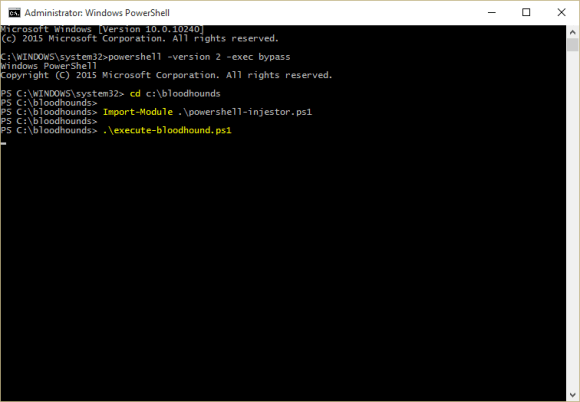
Start the Ingestor Process – Run the Scripts
The following steps will execute powershell, import the bloodhound module (ingestor), and then run the bloodhound script (the one that is a simple one line command: Get-BloodHoundData | Export-BloodHoundData -URI http://localhost:7474/
-UserPass “neo4j:neo4j”.
Step 1: Open a cmd window (elevated) and launch powershell with the the command: powershell -version 2 -exec bypass

Step 2: change directories into the folder where you saved the two powershell files. Execute the command Import-Module .\powershell-ingestor.ps1 (this is the ps1 file you downloaded from GitHub)

Step 3: Execute the powershell script you created earlier with the simple command .\execute-bloodhound.ps1. You may have to wait a few moments.

What was done so far…
- We grabbed all the files we need: 2 powershell scripts, an installer for Neo4j and the BloodHound binaries (this blog is using the Rolling Release which is 1.0.1 at the time of writing).
- Installed Neo4j database and established a connection to verify everything is in working order.
- Executed powershell, imported the bloodhound module and then execute the collection/ingestor process (another powershell script).
At this point, the powershell script has done its thing and reached out to the domain. It has queried the domain controller and imported the results into the Neo4j database. It is time to use BloodHound to map our results….
Running BloodHound
At the time of writing this blog, BloodHound 1.1 is in early release. It was not behaving well in our environment, so we are running the Rolling Release (1.0.1 at time of writing).
When you launch BloodHound you only need to connect it to the database. Here are the basic steps….
Run BloodHound.exe

Connect to the database (wherever you may have installed it). For blue team stuff this is typically going to be localhost. The default creds are shown below. Note: that in the newer versions of BloodHound (beginning with version 1.1) the database URL uses BOLT and not HTTP. So the URL will look like “bolt://localhost:7687”

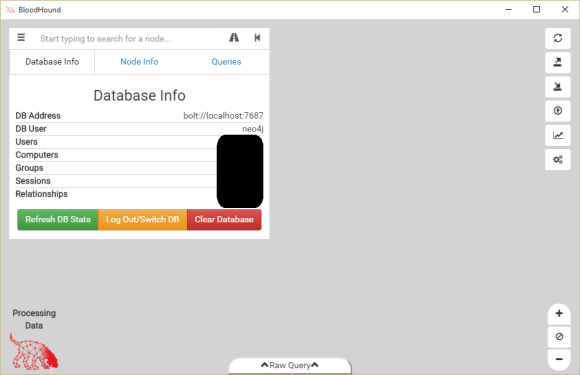
Once you get logged in, the window below will appear. Click the the lines to drop a menu down.

Database information will be displayed. If you see no record counts, then that means your ingestor is either not working or taking a while. Most likely it’s taking some time, so be patient. If you are not sure, then you can always log directly into the database and look at records manually. If you see records, then something could be awry with the connection between BloodHound and Neo4j.
If you see records, then check out the Queries tab! The below picture shows the number of Domain Administrator accounts in the test environment. You will see a number of other pre-built queries. One of the most valuable of which is “Find User with the Most Local Admin Rights”. The newer version of BloodHound has some additional queries that might be helpful (such as “top 10” users with certain permission types). You may be surprised what you find in here. Don C. Weber just posted another blog about writing custom queries for BloodHound, which can be found here.

In Summary
BloodHound is an awesome tool that enables us to measure specific risks based on privileged account configurations in our network. You can quickly identify if there are any outlying accounts on the network which could fall victim to credential theft (à la incognito or mimikatz). Red Teams use this tool to identify machines to attack based on the probability that it will give them a better chance of acquiring administrator or domain administrator rights. Know your network!

powershell-ingestor.ps1 script missing from github
LikeLike
https://github.com/BloodHoundAD/Bloodhound/wiki/Data-Collection-Intro – note that the 2.0 version ps1 goes by sharphound.ps1 now https://github.com/BloodHoundAD/BloodHound/tree/master/Ingestors
A great place to get support is on their (very active) slack channel. I have not logged in ever, but I hear there’s a good group of registered folks there (2000+ people): http://bloodhoundgang.herokuapp.com/
LikeLike